The goal of content design is to reduce confusion and improve clarity. Yet often it’s…

Our Best Practices Guide (Part 1) — TechRuum
Hi! My name is Daria, and for the last two years, I’ve been working at Devexperts. I have experience creating various products, from crypto wallets to exchange administration platforms. Our target audience is diverse from professional and non-professional brokers, novice and experienced traders to dealing staff and trade desk operators. All of them use financial tools daily, and some of them — with high intensity.
Сontinuous use of the product under high tension conditions (which is common when we talk about the financial sphere) might cause eyestrain and general weariness. Consequently, users might make poor decisions and become inattentive to details, which will lead to harming their investment portfolios. My goal, as a designer, is to prevent these drawbacks and make daily operations comfortable.
The main designer’s instrument to work with the product is the UI kit, a collection of reusable components, such as controls, color palettes, effects, and text styles. Typography is an important part of it as it defines a text style library and conveys the most valuable and powerful instrument — the information — from platform to user.
To explain my approach to digital product typography, I invite you to go over each step, from research to implementation. Before diving deep, let’s cover the basic terms.
Basic Terminology Before We Begin
A typeface (or a font family) is a range of graphically similar fonts with a common visual idea behind them. For example, Helvetica is a typeface.
A font is part of a typeface. It is a collection of symbols that might differ in weight (Semibold/Bold/Black), might be upright or italic (Regular/Cursive/Italic), have various widths (Narrow/Wide), and so on.
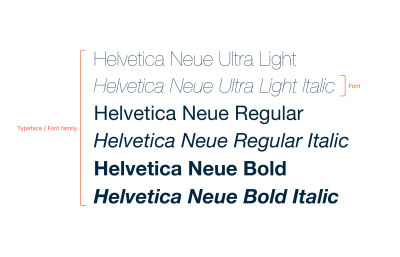
Please keep in mind that these two terms are often interchangeable, even when used by type designers.
Now that we have our basic terms defined let’s go over our suggestions on the workflow when creating or choosing a font for a fintech product.
Step 1: Detect Data Types And User Flows
If you’re a fintech designer in the trading sphere, you’ll mainly deal with spreadsheets. Usually, they represent fundamental page units with data on markets.
Other standard data media include product cards and forms for order entry, cancellation, adjustment, and so on. Product cards provide users with more detailed information on trading instruments, while forms allow users to interact with markets. These interactions are user flows.
What do all these different kinds of information have in common? They’re all displayed as texts. In this case, the core design values are the following:
- An appropriate typeface,
- Working with typography,
- A layout,
- An accurate representation of information.

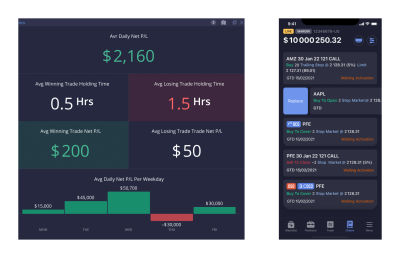
In the picture above, you can see the example of a platform for exchange administrators with all typical types of data. A spreadsheet displays a list of trades and dozens of their parameters. At the back is an example of a trading instrument card (currency pair) with dynamic quotes that update in real time. The chart displays trade history with prices and volumes, and the Market Depth graph at the right shows the current state of the market — the volume of Buy and Sell orders and their prices.
Now when we have defined the most common types of data in fintech products, let’s zoom in and see what specific circumstances we need to consider in our product.
Step 2: Consider Your Requirements
Best design practices facilitate current requirements and consider potential scenarios of product evolution. When working on a fintech product, you should also consider features such as language support, special characters, and use conditions. Let’s have a look at these spheres and highlight the most considerable points in each of them.
Language Support
Forecasting specific typographical cases at the start of a project might be a great investment for future development. For instance, product localization and translation to various languages is one such case. Should your product support one or multiple languages? If multiple, try to understand the average difference in word lengths.
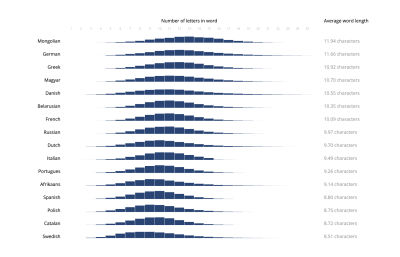
For example, German words are generally much longer than English ones. Compared to these two, French and Spanish words are somewhere in between. Consequently, French or German versions need more text space in design than the English one, which will cause layout changes.
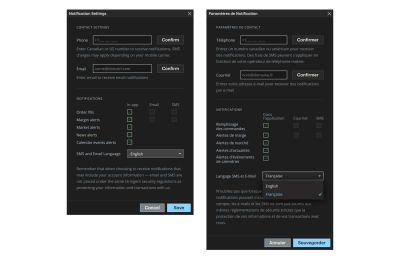
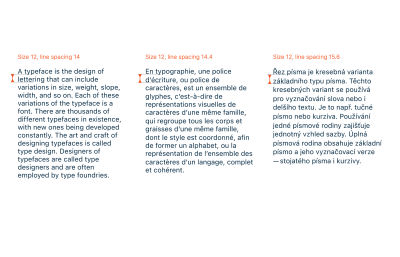
Many languages also use diacritics (additional typographical signs above and under the letters). These writing systems may require more space between lines to make texts more legible.
Logographic or logosyllabic writing systems are quite the opposite: unlike Latin-based languages, they are usually very compact. Few font families support both hieroglyphic and Latin languages, though. So, if you can’t find an appropriate font for your needs, you’ll have to pick out two different typefaces that will match visually.
Having information on supported writing systems and future localizations will allow you to choose a typeface with all the necessary languages. Contact the product owner or manager to determine which languages may appear in your product. This way, you will develop a design for all corner cases and create a visual system fit for all localizations.
Required Symbols
Another critical aspect to consider from the start is special characters. For example, in the fintech sphere, the designer deals with trading markets and often needs to use a variety of currency symbols, math formulas, and decimals.
There are plenty of ways to find out what glyphs a typeface includes. You can learn this information on Type Foundries websites and typeface marketplaces. Check the type specimen to explore all supported features, glyphs, languages, and characteristics.
If you already have a typeface on your laptop, it’s easy to check glyphs in a Font book if you use macOS or a Character map if you operate Windows.
Below, we have an example from macOS. Select the font and switch to the repertoire preview mode to find an entire spreadsheet.

You can also make use of a font-managing app. One of its perks is the font library management according to characteristics. There are many such apps, so it should be easy to find the one that suits your taste and budget. A good option might be Typeface or FontBase if you’re looking for a free app.
Another challenge with glyphs that awaits you is Figma. Unlike Adobe products, it doesn’t offer a glyph panel. It means you don’t see the full contents of a font and can’t choose a symbol you need directly on Figma. However, you can copy the required glyph from the Font Book or Character map and paste it into your design.
Use Conditions
When you start a new project, consider what type of information it represents and the most common use conditions. For example, if it’s an article, it’s mostly text information with extensive accented quotes, or the text consists of short paragraphs broken down by photos. We presume that the user will most likely read it in a calm setting, as it is the most comfortable way to concentrate on a long text and will need half an hour to finish it.
Let’s review a drastically different case. We’re designing a product for professional use overloaded with data comprising mostly repetitive figures. Users operate various gadgets to work with the data all day in varying conditions. They can get tired and lack attention but must analyze the data and react swiftly.
When we work with fintech products, we mainly work with the second scenario. Our average user deals with numbers and important operations. Investors analyze markets and trade securities, while trade desk operators manage orders. Even a slight hiccup in data performance may cause a great mistake in operations. A carefully selected typeface and precise layout will help you support your user and make their workflow convenient.
Step 3: Discover Typeface Options
Understanding typeface features will help you decide on the most suitable fonts. For this reason, we’ll first break down the categories and characteristics of typefaces.
Classes
Typeface classification has been a subject of discussion for typographers for a long time. (For further information, you can read “The trouble with font classifications” and “Talking about type:
from Aristotle to Arial.”) For years the common classification, adopted by Association Typographique Internationale was the Vox-ATypI system, invented by Maximilien Vox in 1954. This system is based on two characteristics of type: visual traits and the historical period of its appearance. It included nine categories that were later expanded to 11 by ATypI.
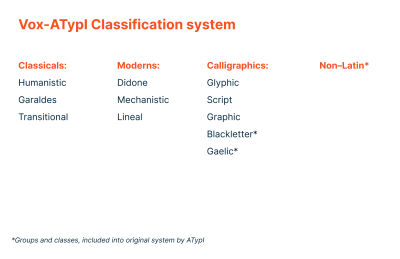
However, typography has developed dramatically, and this system does not reflect modern type design, as it simply ignores a big part of contemporary typefaces. Most modern typefaces tend to have a mix of characteristics from different historical periods and refer to several categories. The endorsement of this system was withdrawn in 2021, and, at the current moment, the association is working on a new system that would meet needs of modern typographers.
The Vox system might be useful for the exploration of type design history and research if you want to dive deep into this theme. However, for the daily use of a product designer, classification according to visual characteristics rather than historical periods might be more helpful. The division into four abstract meta-groups, based on the Vox system with some additions from modern typeface design, will help you to classify typefaces clearly enough.
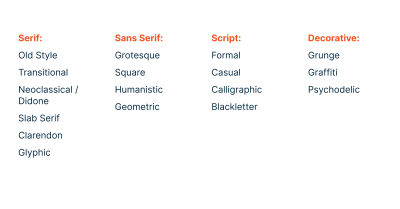
Note: If you’d like to dig further, you may want to check other classification systems.
Typeface Proportions
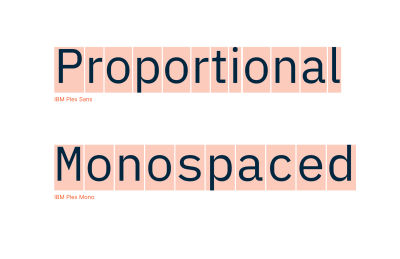
Typefaces fall under two headings: proportional or monospaced, according to the ratio of proportions within the font.
Proportional types have varying widths of letters according to tradition, rules, and the ideas of their designers.
Monospaced fonts, in contrast, comprise characters of equal width. Design of the glyphs in monospaced typeface may vary: wide characters, such as m or w, may have narrow proportions to fit the width. Such thin letters as i or l may have a lot of empty space around or long serifs to fill this space. In any case, the width of each letter, including its space around, will be equal.
Proportional typefaces are natural and traditionally used for daily needs. Monospaced fonts are usually used in specific cases when it is essential to set text in accurate columns with each symbol below the other, such as tables with numerals, sales checks, programming code, and so on.
Characteristics
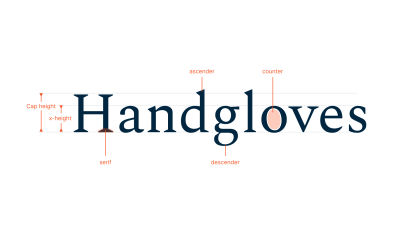
An essential measurement we constantly work with is the size of a typeface or its x-height. It’s the height of the actual letter in lowercase from the baseline to the mean line that equals character x. Capital height refers to the size of uppercase letters. Small caps are the characters whose height is between lowercase and caps. They are a great instrument for particular cases.
Ascenders and descenders are the elements that go above the mean line and beyond the baseline. The long stem in h is an ascender, and the falling tail in y is a descender.
A counter is an enclosed space inside a letter. For example, in o’s or q’s, the white inner space is a counter.
Serifs are short strokes at the end of stems that differentiate Serif typefaces from Sans Serifs.
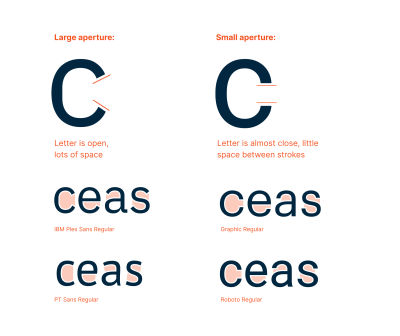
An aperture describes to what extent symbols are open. A large aperture means that such letters as c or s are open and have a lot of space between their strokes. When these symbols are tight and closed, the aperture is small. This characteristic specifies legibility: a large aperture helps distinguish similar letters in small sizes, such as c and o.
Contrast is a difference between stroke thickness in vertical and horizontal stems.
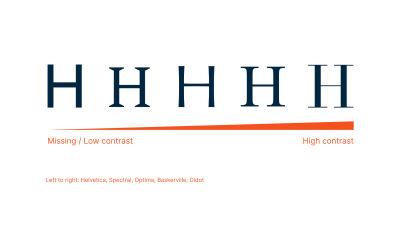
These terms are basic but essential for understanding how the characteristics of a typeface affect its legibility. If you want to dig into this word, check out the Monotype terms dictionary.
Step 4: Define The Typeface’s Purpose
All typefaces may be divided into “display” (or “headline”) and “text” groups. However, there are existing cases when typeface works well both as text and display. (For more information, check “Text v. Display” and “Selecting Display Type: Getting Started.”) Both these sides have their character and tone of voice, but they’re meant to be used in different contexts and situations.
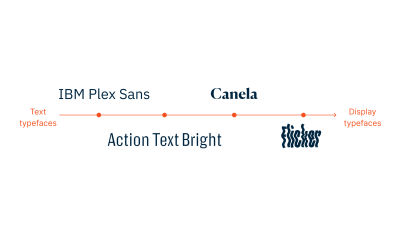
Display fonts are better suited for headings, accents, and other cases for large font-size texts. They often have tighter spacing and sophisticated shapes that fade and may cause visual noise in small sizes. But it never hurts to consider the circumstances of use. Users might need more time to recognize a display font with complicated shapes, even in a large size.
High contrast is also a font characteristic of the display role and long ascenders and descenders.
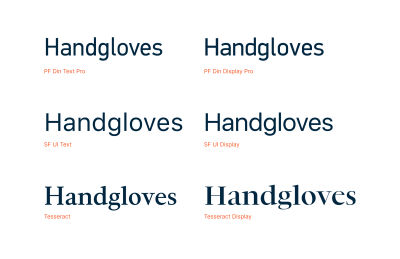
Alternatively, body text fonts have a simplified appearance and a high level of legibility in small sizes. When choosing a typeface for a body text, go for one with low or no contrast. In this case, high contrast will affect readability: thin strokes will cause visual vibration and negatively influence readability. Large aperture and open shapes are also a good choice as they help keep similar letters distinct, such as c and o.
Different graphics in similar letters, such as i, l, and I, help perceive letters, especially without context (when used in tickers, codes, sets of symbols, and so on). Most text fonts have enlarged x-height and counters, a slight difference in heights between lowercase and caps, and short ascenders/descenders. Thus, it saves vertical space for lengthy texts and ensures their legibility.
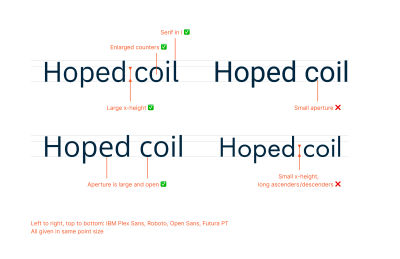
If you have plenty of data and need to save horizontal space, a font with compact proportions may be a suitable solution. But avoid overly narrow fonts and consider a font size because you might need to enlarge it a little and add positive tracking, i.e., increased letter spacing (for further information about tracking, don’t forget to check Part 2).
Body text in a nice, readable font often needs strong visual accents in your design. You can approach this necessity by differentiating fonts depending on the type of information. For example, you may use Serif for headers and Sans-Serif for body text. The ultimate working solution, though, is to pick a single Font family because it has the same shapes and proportions. For example, IBM Plex has a variety of styles and supports several writing systems.
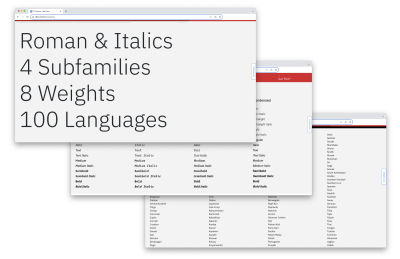
A typeface name itself can tell you about its purpose. Terms “Text,” “Display,” “Compact,” and “Caption” in the font’s name will help you make the right choice.
In my projects, I usually use Sans-Serif fonts with low contrast for practical reasons. Sans Serif doesn’t have a bright appearance or small details. Consequently, it draws little attention to itself and reduces visual noise, making the text easier to read. As a result, the user quickly receives, understands, and processes information.
Prepare For Part 2!
This article reviewed the key points to consider when choosing typefaces. We also reviewed all font parameters and started investigating how to choose the most suitable font for various scenarios.
The next part will be all about applying the fonts we chose. We’ll discuss how to work with texts and tables and what to pay attention to when handling special characters.
Another major topic will be readability improvement through the length of text lines, line spacing, letter spacing, and tracking.
We’ll also touch upon the topic of color contrast. It goes hand in hand with caring for users with all kinds of needs and work conditions.
Stay tuned!
Further Reading On SmashingMag
(yk)
#Practices #Guide #Part #Smashing #Magazine
